
Blazor Introduction
Blazor is a new .NET web framework that was released by Microsoft. In this article, I will walk through you to create a simple Blazor application using Visual Studio 2019.
We can create both client-side Blazor app and server-side Blazor apps using Visual Studio 2019 which offers both the project templates.
The Server-side Blazor app runs on the server-side ASP.NET Core app and handles user interactions using SignalR connections. On the other hand, the client-side Blazor app runs on WebAssembly which is supported by most modern browsers. We will see more about the difference between the server-side and client-side Blazor app in another article.
Prerequisites
- Visual Studio 2019
- .NET Core SDK 3.1
How to create simple Blazor App using Visual Studio?
Follow the simple steps to create your first Blazor application (Server Side).
Step 1: File -> New -> Projects

Step 2: Select Blazor App project template.

Step 3: Enter the Project Name, Here I have entered “MyFirstBlazorApp”. Then proceed with the “Create” button.

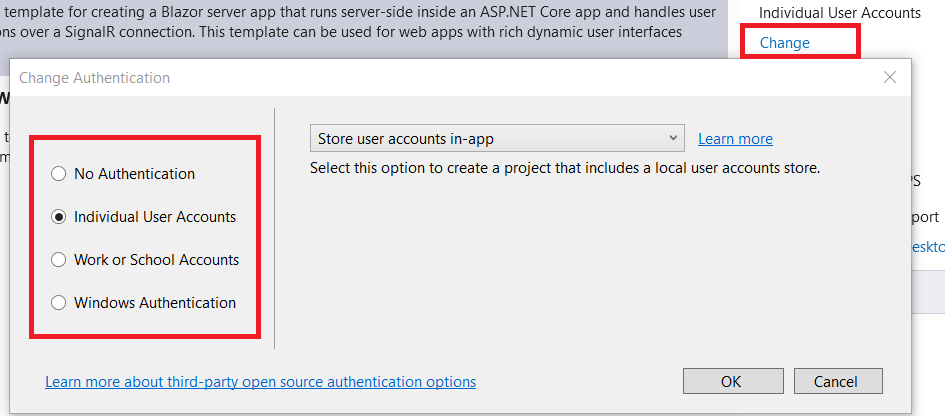
Step 4: Select the Blazor Server App project template and make sure No Authentication is chosen. Then proceed with the “Create” button.

Note: If you want to create the Blazor Application with Authentication, you need to change the Authentication by clicking on the change link. Refer below,
Note: You can refer to the article about how to implement cookie-based Authentication in the ASP.NET Core application. You can apply the same logic with the Blazor application.
https://karthikekblog.com/cookie-authentication-in-asp-net-core-mvc-web-application/
That’s it you have successfully created your first Blazor app using Visual Studio 2019.
Blazor Application Files Explained
So, what happens once you have created the Blazor application. Yes, you need to know about the files which by default created with these Blazor project templates.
Here the following files are created,
- Program.cs – which is the starting point for the app that starts the server.
- Startup.cs – where you configure the app services and middleware.
- App.razor – This is the root component for the app.
- MyFirstBlazorApp/Pages Directory – which contains sample web pages for the app.
- MyFirstBlazorApp/Shared Directory – which contains sample shared layouts and components for the app.
- MyFirstBlazorApp/Data Directory – which contains data model required for the app.
- appsettings.json – Apps default settings.
- MyFirstBlazorApp.csproj – app project file.

Build and Run the Blazor App
You can just build and run (F5) the application to check whether everything works fine here, see what you get after the successful run,

You can navigate to different pages using the left navigation menu. There are 3 pages listed, Home, Counter, and Fetch data. Try to navigate to each page and check how it is working.
How to create new component in Blazor?
Blazor simplified the creation of UI components and use those components between different pages. If you are familiar with Angular, React and Vue client-side frameworks, you know how this component model works.
Like other client-side frameworks, Blazor also supports the components, however more simple and efficient way.
Here, I have taken the simple example to create new component which will display the full name of user by getting first name and last name as input.
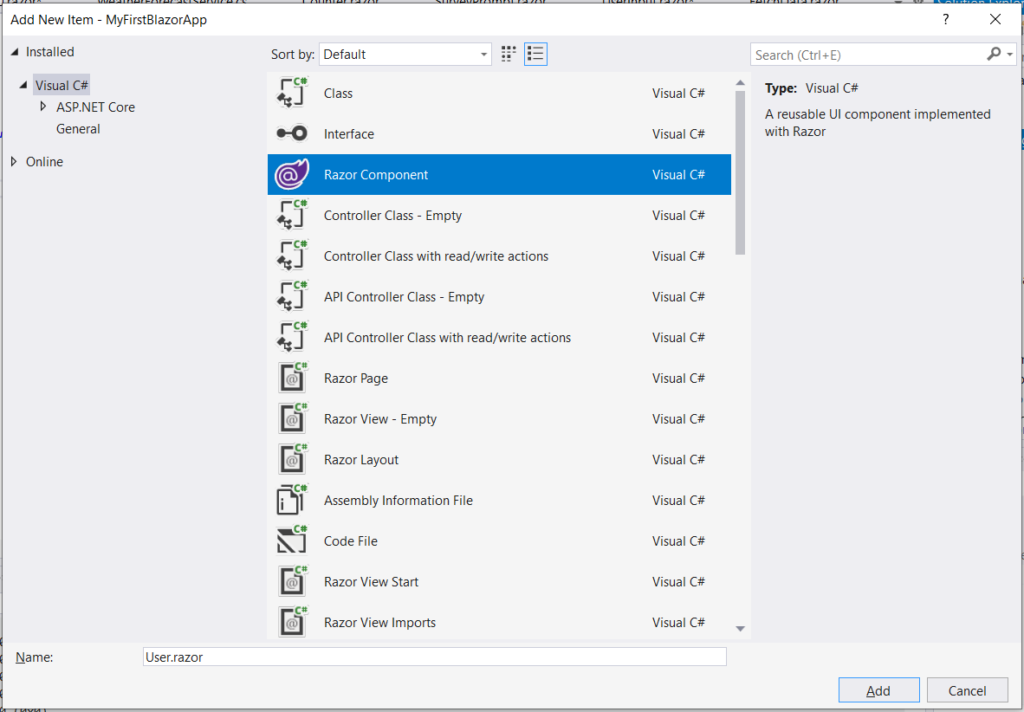
Step 1: Open Solution Explorer. Right click on Pages -> Add -> Razor Component

Step 2: Then select the Razor Component template and provide the component name. Here “UserInput.razor”.
Note: File extension should be a razor.

Step 3: Once the new component file is created, you have to write code to create the component.
Here, I’m going to write code to create a new component that will display the full name of the user by getting the first name and last name as input.
Refer to the complete code:
<h3>Display User's Full Name</h3> <br />

<div>
    <form>
        <div class="row">
            <div class="col-sm-2">
                <label>First Name: </label>
            </div>
            <div class="col-sm-6">
                <input type="text" name="firstName" @bind="firstName" placeholder="Enter First Name" />
            </div>
        </div>
        <br />
        <div class="row">
            <div class="col-sm-2">
                <label>Last Name: </label>
            </div>
            <div class="col-sm-6">
                <input type="text" name="lastName" @bind="lastName" placeholder="Enter Last Name" />
            </div>
        </div>
        <br />
        <div class="row">
            <div class="col-sm-6">
                <button type="button" @onclick="DisplayFullName" class="btn btn-primary">Display Full Name</button>
            </div>
        </div>
    </form>
    <br />
    @if(fullName != string.Empty) {
        <div class="row">
            <div class="col-sm-2">
                <label>Full Name: </label>
            </div>
            <div class="col-sm-6">
                @fullName
            </div>
        </div>
    }
</div>

@code {

    private string firstName = string.Empty;
    private string lastName = string.Empty;
    private string fullName = string.Empty;

    private void DisplayFullName()
    {
        if(firstName != string.Empty)
            fullName = firstName + " " + lastName;
    }

}
Code Explained:
- It is the simple HTML code, which collect 2 inputs (first name and last name) from user.
- One Button click on the button will perform the function that combines first name and last name and display the result into new label.
- Input boxes are bind with properties, so any input given in input boxes bind with the respective properties.
- Button has defined with on click event and the function is derived in code block.
Step 4: Now you have created a new component, you can use this component on any other razor page. To include this component, you must add the following code line.
<UserInput />You can try this by adding the above line to Index.razor page at the bottom like below, a run the application.
@page "/"

<h1>Hello, world!</h1>

Welcome to your new app.

<SurveyPrompt Title="How is Blazor working for you?" />

<UserInput />
How to create new page in Blazor and use the components?
Step 1: This is very simple and it is like creating components. You just create a new Razor component like you did above. Right-click on Pages -> Add -> Razor Component

Step 2: Then name it “User.razor”
Step 3: Once user.razor component created, you can edit that file. At the top, just add the line
@page "/user"That’s it. You have added new page.
Then you can include the existing component which we already created above. So, User.razor file contains the following codes.
@page "/user"

<UserInput />
Step 4: One more step must go, which is adding the page as in the navigation menu. To add it, go to NavMenu.razor file under the shared directory.
<li class="nav-item px-3">
    <NavLink class="nav-link" href="user">
          <span class="oi oi-list-rich" aria-hidden="true"></span> Users
    </NavLink>
</li>
Include the following lines to add new menu items.
Step 5: Build and Run the application.

Conclusion
I hope this article helps you to understand the steps to create a simple Blazor App using Visual Studio and how to add new components and pages to Blazor app. This example shows that creating the Blazor app and Components and reusing those components into multiple pages can be very easy compared to other common frameworks like Angular, React, and Vue.
But Blazor application should be built and run again when made any changes in the razor component to reflect in the browser, On the other hand, React, Angular, and Vue are not required to build for each change made.
To create React application,
To create an Angular application,


Thank you for sharing superb informations. Your web site is so cool. I am impressed by the details that you have on this blog. It reveals how nicely you understand this subject. Bookmarked this web page, will come back for extra articles. You, my friend, ROCK! I found just the info I already searched everywhere and simply couldn’t come across. What a perfect website.